ShopDreamUp AI ArtDreamUp
Deviation Actions


Suggested Deviants


Suggested Collections


You Might Like…


Description
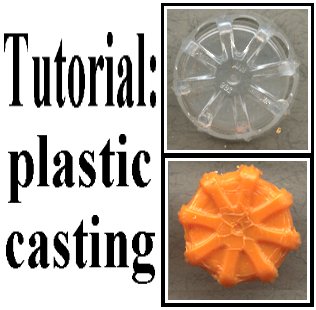
Plastic casting
In this document I will describe a relatively simple form of DIY small scale plastic casting. This method can be used to produce objects with shallow or widely spaced out surface details/textures. One of the side effects of this process is that your cast object will probably have a number of thin wrinkles across its surface. These can be removed or reduced with a craft knife or small file. Because of the limitations of this method, it's unlikely that the items will be used as products purely by themselves. To make a complete project you'll probably have to join multiple shapes together and/or use other materials.
Why use plastic? There are other commercially available products that can do the same job more effectively, but they tend to be far more expensive. Plastic is waterproof, light weight, shinny and colourful (colours can be mixed to created interesting effects).
Materials needed:
1. Tooth brushes made from flexible plastic. These will become your casting substance. Avoid brushes that aren't made purely from one type of plastic.
2. Aluminium kitchen foil. This will be used for making the mould.
Tools needed:
1. Scissors.
2. Something for cutting the plastic into small chunks. I use a pair of pliers with built in wire cutters.
3. A shallow/short and wide steel can.
4. A gas stove.
5. Something to use as a base model (the object that you'll copy).
Selecting a base model / fundamental moulding principals
These two subjects are unavoidable linked. Basically, your mould is created by firmly pressing kitchen foil over the base model. A negative/concave copy of your original object is made. I'll describe the technique in more detail a little later.
To insure that your plastic and foil can be separated after cooling, a single unbroken layer of foil must line the inside of your mould. This is easily done, but it has a side effect. It's difficult to smoothly work the foil into deep narrow gaps.
It's important that the original object has no 'Undercuts' (an indentation in your base model that will hook and hold the Aluminium foil, preventing it from being lifted off).
Attempting to copy/mould an object less than 4mm in depth is very difficult. Thin castings (items you've made from plastic) will be quite brittle.
Your base model will need to be fairly robust. Ideally, it should not bend or buckle when pressed with your thumb. A small degree of flexibility is okay.
Creating a foil mould
Let's assume that you want to create a solid duplicate of a lemonade bottle screw top. The letter 'X' has been scratched into its surface.
1. Place the bottle top on a flat steady surface.
2. You'll need a piece Aluminium foil that's large enough to cover its top and sides, while still having about half an inch left over. This first layer will need to be double thickness, so cut it twice as long as necessary and then fold it back on itself.
3. Place the foil squarely over your base model. Starting from the centre, gently press it into the details and down around the sides. At this point it shouldn't be a tight/close fit. Try to avoid wrinkles. You should have about half an inch of extra foil extending away from the bottom of your model.
4. Cut a second piece of foil large enough to cover the bottle lid (including its sides), plus about 2 or 3 inches more. Now scrunch it gently. It should be thoroughly crinkled, but still very pliable and large enough to cover the base model. Place it squarely over the object. Starting from the centre, press it slowly and very firmly into the details and sides. Holding the middle down with your thumb will help prevent slippage and deformity. Your kitchen foil should now be tightly compacted around the top and sides of your base model.
5. The half inch of extra foil from your first layer should still be visible. Fold it backwards over the second 'scrunched' layer. Press it into the sides. Now gently lift your Aluminium mould (holding it by the sides) off the base model.
Plastic melting/casting
Plastic produces toxic fumes when heated. You must insure that your work place is well ventilated (open windows, nice draft flowing through) and uncluttered. You'll also want a supply of cold water relatively close (kitchen sink). If you burn part of your body, run cold water over the effected area for approximately 20 minuets and then seen professional medical help.
1. Cut one of your tooth brushes into small chunks (excluding bristles), approximately 3mm or less in height, width and depth. Use as many as necessary to fill the mould.
2. Place your mould into the wide, shallow can (this will act as a flame guard). Put the can onto your gas hob. Turn the flame up fairly high and then wait until the first small signs of melting appear (these include: drooping, sinking in on itself, moving and dripping). When this happens turn the power down to about half. If the plastic darkens, bubbles or blackens, it's starting to burn. If you see any of those things happening, reduce the heat immediately. Over cooked plastic tends to be very brittle. Try to melt it slowly over a long period of time (about 10 minuets for an object this size). This reduces the likelihood of air being trapped inside the casting. Completely liquifying the plastic is not the goal. It'll burst into flames long before you achieve that. Instead, you need to heat it just enough to make it soggy, so that it can ooze into the correct shape.
Safety note: plastic behaves a lot like oil when on fire. I strongly recommend you do some research into controlling/extinguishing a plastic fire.
3. Once you're happy that the plastic has melted sufficiently (its surface will probably be smooth and slightly bumpy). Turn off the gas and leave until the can and its contents are cool.
4. Slowly peel off the foil to reveal your cast object. Practice will improve your results. As I've already side, this method does have significant limits. However, I do regard it as a useful skill for anyone interested in art & crafts.
© 2004 - 2024 sabbathgold
Comments10
Join the community to add your comment. Already a deviant? Log In
intesting! would you have an example of wad kind of tooth brush would work? i once had this lil thiong tat said if you boil the toothbrush stick and bend it you can get a toothbrush bracelet but it din work.. o.o